Unable to Install Google Chrome In Windows 10
In most cases, the reason for Google Chrome not installing in Windows 10 is provided by the error message. For example, if you are looking at “Google Chrome is already installed on your computer” error message, the problem can be fixed by Uninstalling and Reinstalling Google Chrome. Similarly, if your computer is in S Mode, it will not allow installation of third party App and you will see an error message reading “Can’t install Chrome because you’re in S mode”. You will find below the steps to fix the problem, after which you should be able to Install Google Chrome on your computer.
1. Disable S Mode on Windows Computer
As mentioned above, if your computer has arrived with Windows 10 S Mode, it will prevent you from installing Third Party Apps, including Google’s Chrome browser. The solution in this case is to switch to regular Windows 10 by disabling S Mode on your computer.
- Open Settings > click on Update & Security.
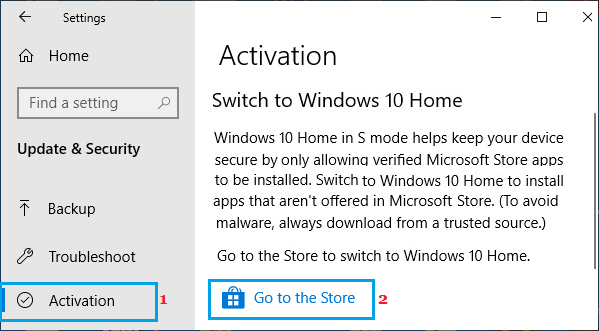
- On the next screen, click on Activation in left-pane. In the right-pane, click on Go to the Store option, located under ‘Switch to Windows 10 Home’ or Pro section.
Note: Do not click on “Go to Store” option under ‘Upgrade Your Edition of Windows’ section. 3. On Switch out of S Mode’ screen, click on the Get button. 4. On the next screen, click on the Install button to get the regular version of Windows 10 on your computer.
2. Reinstall Google Chrome
If you are looking at “Google Chrome is already installed on your computer” error message, the problem can be fixed by Reinstalling Google Chrome on your computer.
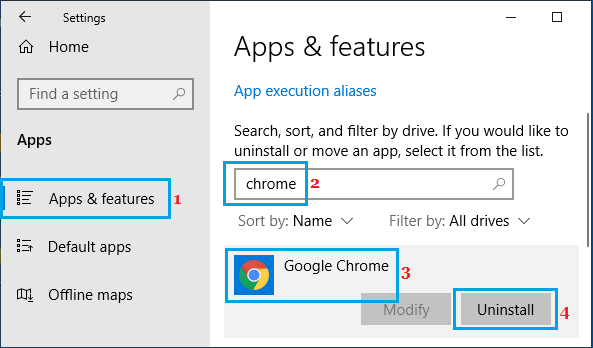
Open Settings > click on Apps.
On the next screen, type Chrome in the search bar > click on Google Chrome and click on the Uninstall button.
After Uninstalling Chrome, download and Reinstall Google Chrome back on your computer.
3. Delete Chrome Client Registry Entry
If you are looking at “Can’t find installer applications on Windows” message, the solution is to delete the Registry key.
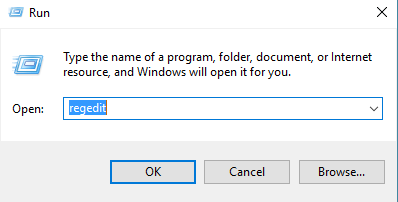
Right-click on the Start button and click on Run.
In Run Command window, type regedit and click on OK.
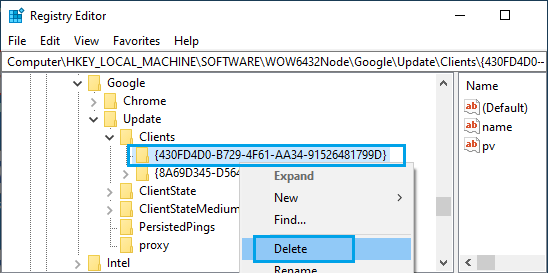
On Registry Editor screen, navigate to HKEY_LOCAL_MACHINE\SOFTWARE\WOW6432Node\Google\Update\Clients
Right-click on 430FD4D0-B729-4F61-AA34-91526481799D folder and select the Delete option.
Close the Registry Editor and try to Install Google Chrome on your computer.
4. Enable Installation of Third Party Apps
You won’t be able to Install Google Chrome, if installation of third party apps is not allowed on your computer.
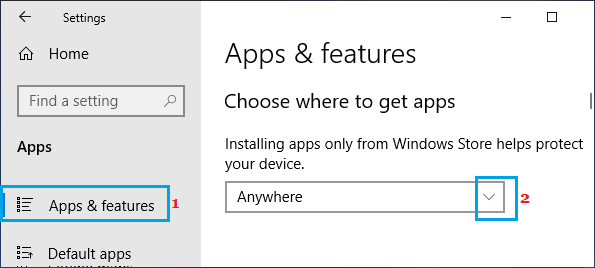
- Open Settings > click on Apps.
- On the next screen, click on Apps & Feature in the left-pane. In the right-pane, click on the Down-Arrow and select Anywhere or Warn while installing Non Microsoft Apps option.
5. Enable Background Intelligent Transfer Service
Another reason for installation of Google Chrome failing on a Windows computer is due to Background Intelligent Transfer Service (BITS) being disabled.
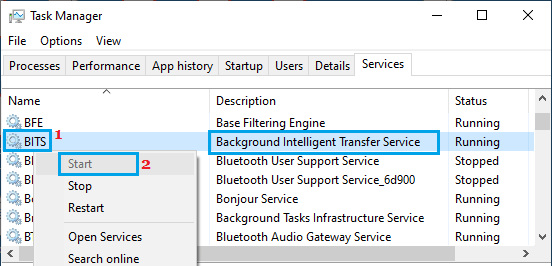
- Right-click on the Start button and click on Task Manager.
- On Task Manager screen, select the Services tab and make sure BITS service is running.
If BITS is not enabled, right-click on BITS and select the Start option.
How to Make Chrome As Default Browser in Windows 10 How to Clear Cache in Google Chrome Browser
