This error code occurs during the update due to the absence or damage of certain files. Thanks to that, the Windows Updates fail to complete. Luckily, there are multiple solutions to the problem and you will read about them in this article. So, breathe a sigh as these fixes are everything that you probably need against the error.
How to Get Rid of Error Code 0x80073712
If you have encountered this hurdle while updating Windows, know that there are some workarounds that you take a hand from and wave goodbye to this error. Here are some fixes that you can try out today.
1. Restart Windows Update
If you had no luck in using the Windows Update troubleshooter and the error code 0x80073712 is still persisting on your operating system, then here is another method that you can use to fix your problem. In order to eliminate the error code, you can consider restarting your Windows Update services and see if that helps. To do that, you can follow these steps: Step 1: Open Run by pressing the Windows logo and R keys on your keyboard simultaneously and then type services.msc. Step 2: Hit the Enter button and look for the Windows Update service. Then, you have to check the status. Step 3: Right-click on the service and hit the Start option from the menu list that appears. It will force start the Windows Update. Step 4: In case you encounter an error there, you need to find the Startup Type option and then set it to Automatic mode. Once you are done following this process, you can reboot your operating system and see if the method was helpful to you. If the error is still bothering you then you can move on to another fix and try it out. Read Also: How to Fix Error Code 0x800f0988 in Windows 10
2. Use Windows Troubleshooter
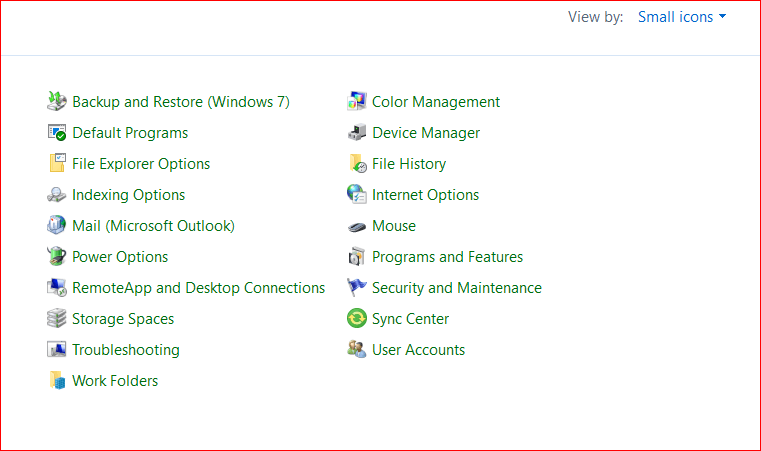
If the Windows update error code 0x80073712 is troubling and keeping you from operations on your device then you can seek help from Windows Update Troubleshooter and help yourself out. Windows has a built-in solution for allowing you to troubleshoot the issue with an onscreen guide that you can follow to fix issues on your system. Here are the steps for using Windows troubleshooter in order to fix this issue: Step 1: You have to launch the Control Panel on your screen. Step 2: Once you are there, click on the category drop-down menu and select Large or Small icons from there. Step 3: Now, choose the option of Troubleshooting and hit the View all option from the left pane.
Step 4: In the next step, spot and select the Windows Update option and then go to the Windows Update Troubleshooter. Step 5: Here you should be able to view the on-screen instructions that will help you resolve your issue. You have to keep following them. In order to save the changes you just made, you have to restart your system and then check if your problem has been solved now or you can use another method on this list to get rid of the error. Read More: Fix “This Site Can’t Be Reached” Error in Chrome
3. Rename Software Distribution Folder
Renaming the Software Distributor folder has proved to be an effective method to resolve the Windows Update error 0x80073712, as applied by many users. To use this useful solution against your problem, you have to go to the Command Prompt and then input these commands one by one. Know that you have hit the Enter button after each input. net stop wuauservnet stop cryptSvcnet stop bitsnet stop msiserverrename c:\windows\SoftwareDistribution softwaredistribution.oldnet start wuauservnet start cryptSvcnet start bitsnet start msiserver Now hit Exit. Once done, you can reboot your Windows 10 PC to complete the process and see if the problem has vanished.
4. Use the DISM
If the methods mentioned above have been of no help for you, then you can use the Deployment Image Servicing and Management (DISM) solution to ease your issue. Given that this issue can be a result of corrupted or missing Windows files, running these services may be all that you need. To run DISM and SFC tools, you can follow these steps and try to resolve the issue: Step 1: Open Search by pressing the Windows + S keys and then type CMD there. Step 2: Now, you have to choose Command Prompt and then, right-click on it. Step 3: After that, you have to select the run it as administrator option in order to launch an elevated command prompt. Step 3: You now have to confirm and enter the details that are required there in order to move further with the process. Step 4: Then, enter ‘DISM.exe /Online /Cleanup-image /Restorehealth’ in the command prompt. Hit Enter and wait while the scan processes. Now that you have entered the command into the command prompt, you should wait while the scan goes on. Follow the guide step-by-stop and remember to not interrupt the scan or the entire process will be aborted. Once the process is complete, you can see if you are now able to update Windows. Read More: How To Update Device Drivers on Windows 10
Windows Update Error Code 0x80073712: Fixed
Now that you have learned about different troubleshooting methods, you should be able to release your operating system from there. If you have more to add or any views to share, feel free to drop your words in the comment section.
