Err Network Changed Error in Chrome
ERR NETWORK CHANGED usually appears with an error message reading “Unable to access the network”. As you can see, the error code ERR_NETWORK_CHANGED broadly points to some kind of Network connectivity issues on your computer and does not provide any specific reason for the problem. Hence, any of the following network troubleshooting methods might help in fixing Network Changed Error on your computer.
1. Restart Computer and Modem
Starting with a simple fix, simply Restart your computer and see if it helps in fixing the problem. If you are still unable to access the internet, unplug your Modem/Router from its power source (Wall Socket) and wait for 60 seconds. After 60 seconds, start the Modem/Router and patiently wait for all the lights to turn green. Now, try to access the webpage and see if you are still getting Err Network Changed Error in Chrome browser on your computer.
2. Clear Chrome Browser Cache
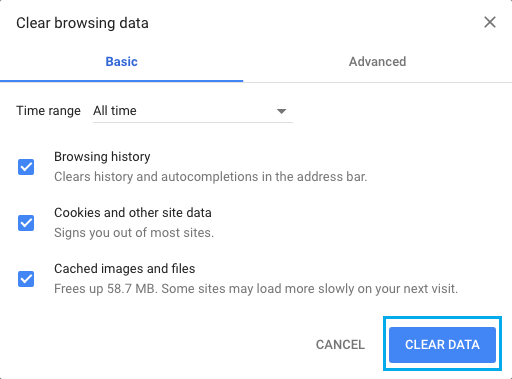
Open Chrome browser > click on the 3-dots menu icon > hoover mouse over More Tools and select Clear Browsing Data option.
On the next screen, choose All Time as the “Time Range” > check Browsing History, Cookies & Site Data, Cached Images and Files and click on Clear Data button.
After this, try to access the webpage and see if you are still getting Err Network Changed Error on your computer.
3. Run Network Troubleshooter
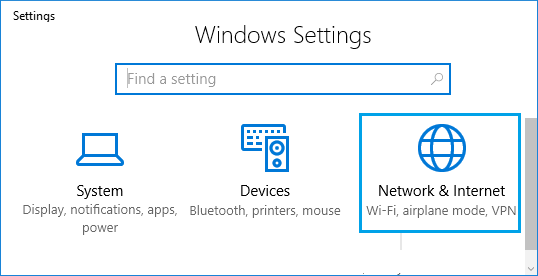
Open Settings > click on Network & Internet.
On the next screen, click on Status in the left-pane. In the right-pane, scroll down and click on Network Troubleshooter option.
Wait for Windows to diagnose and fix connectivity problems on your computer.
4. Run Network Troubleshooting Commands
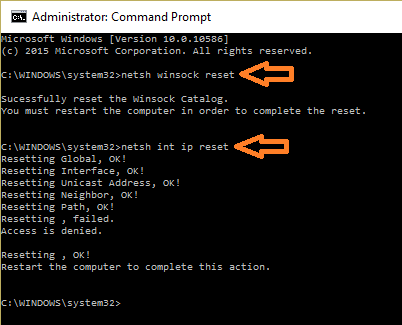
The next step is to run Network Troubleshooting Commands, in order to Reset the TCP/IP Stack, Release IP address, Renew IP Address and to Flush and Reset the DNS client resolver cache.
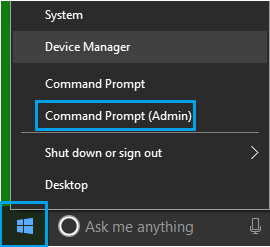
Right-click on the Start button and click on Command Prompt (Admin).
In the Command Prompt window, type netsh winsock reset and press the enter key.
Next, type netsh int ip reset and press the Enter Key. Similarly, run the following commands one-by-one. 3. After running above commands, type Exit and hit the enter Key to close Command Prompt Window. Restart computer for the changes to take affect and see if you are still getting Err Network Changed Error on your computer.
5. Forget Your Network
Sometimes Network profiles can get corrupted and cause network connectivity problems. This can be fixed by making your computer forget the Network and joining the Network back again. Before following these steps, make sure that you write down your “WiFi Network Name” and “Password” – you will need these to rejoin the network.
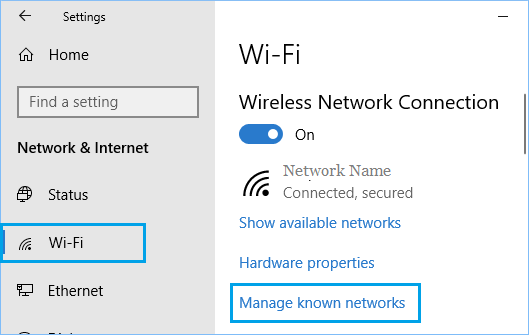
Open Settings and click on Network & Internet.
On the next screen, click on Wi-Fi in the left-pane. In the right-pane, click on Manage Known Networks option.
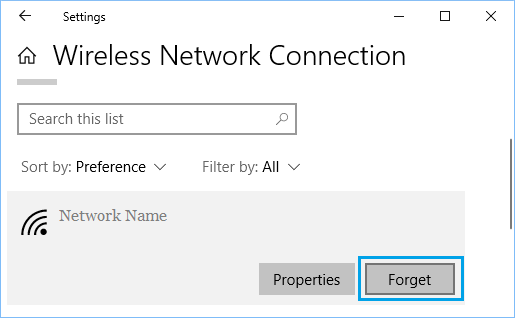
On the next screen, click on your WiFi Network and click on the Forget button.
After forgetting the Network, rejoin your WiFi Network again and see if you are able to access the same website that you were trying to access.
6. Disable Proxy Servers
The most common reason for network connectivity issues on a computer is due to use of Proxy Server Settings.
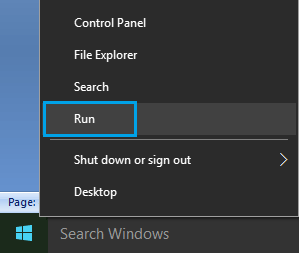
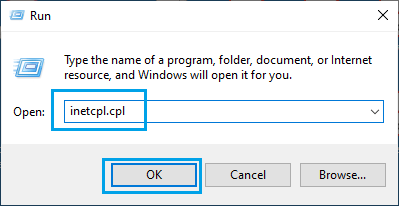
Right-click on the Start button and click on Run.
In the Run Command window, type inetcpl.cpl and click on OK.
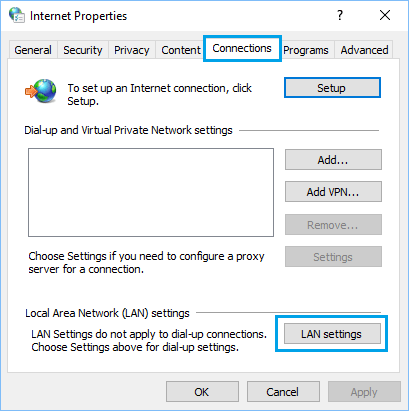
On internet Properties screen, select Connections tab and click on LAN Settings button.
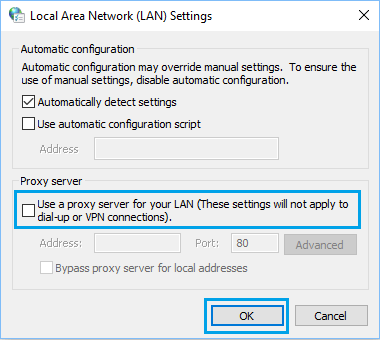
On the next screen, uncheck Use a Proxy server for your LAN option under ‘Proxy Server’ section.
Note: Make sure Automatically detect settings option is selected. 5. Click on OK to save the settings on your computer.
7. Update Network Driver
Windows should automatically update the network software on your computer. However, sometimes this may not happen, resulting in network connectivity problems.
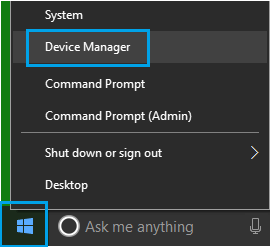
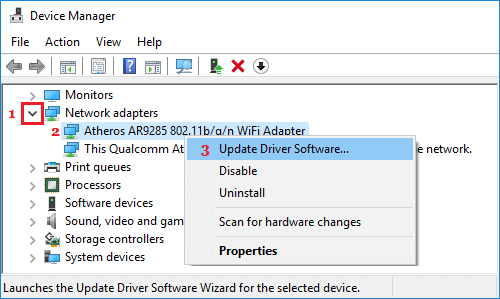
Right Click on the Start button and click on Device Manager.
On Device Manger Screen, expand Network Adapters entry > right-click on WiFi Adapter and click on Update Driver Software option.
Tip: If you see multiple entries, look for something that reads Network, 802.11b or has WiFi in it. 3. On the next screen, select Search Automatically for Updated Driver Software option.
8. Switch DNS Servers
If you are frequently dealing with network connectivity issues, you can consider consider switching from DNS servers of your service provider to Google’s fast and free DNS service. For more information, you can refer to this guide: How to Change DNS Servers in Windows 10
How to Fix Err Network Access Denied Error in Chrome Fix: Failed Network Error in Chrome While Downloading