Lock Screen in Windows 10
When you are at a workplace, there will be other people around you, which increases the possibility of personal data being exposed. This can happen when you leave your cubicle, work table or work corner for a coffee break and also happen when someone unexpectedly shows up in your cubicle. An easy way to prevent your personal information and other stuff from being seen by others is to get into the habit of locking the Screen on your computer, whenever you step away from it. Hence, we are providing below 5 different ways to quickly Lock Screen in Windows 10.
1. Lock Screen Using Ctrl +Alt +Delete Keys
Press Ctrl + Alt + Delete Keys at the same time on the keyboard of your computer and click on the Lock option in the pop-up screen that appears. While this is probably the most commonly used method to quickly Lock Screen in Windows 10, it is not fast as the second method as provided below.
2 Lock Screen Using Windows + L Keys
Press the Windows Logo + L Keys at the same time on the Keyboard of your computer and this will immediately Lock you out of the current screen and take you to the Login Screen.
3. Lock Screen Using Start button
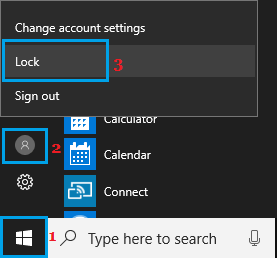
Click on the Start button > User Icon and then click on the Lock Option.
This method is suitable for those who have a hard time remembering Keyboard Shortcuts.
4. Create Shortcut to Lock Screen in Windows 10
If you find it difficult to remember keyboard shortcuts, you can create a shortcut that can allow you to Lock Screen in Windows 10 by clicking on it.
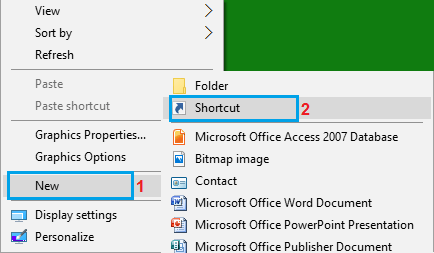
Right-click in any blank space on the Desktop > click on New > Shortcut.
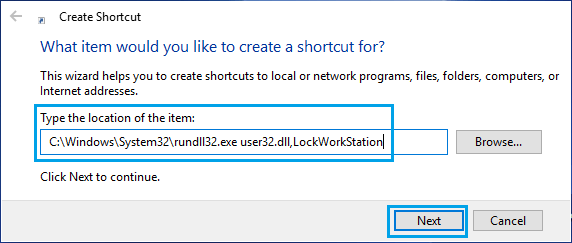
On Create Shortcut screen, enter C:\Windows\System32\rundll32.exe user32.dll,LockWorkStation as location for the item and click on the Next button.
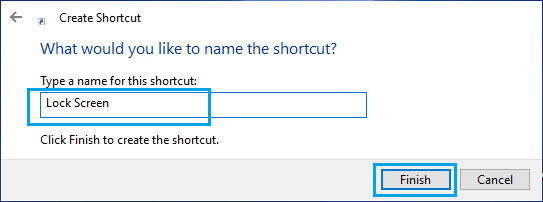
On the next screen, type a Name for the shortcut (you can call it “Lock Screen”) and click on Finish.
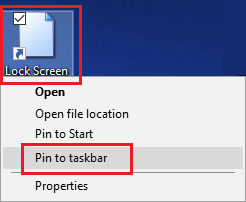
Next, right-click on the newly created Shortcut and select Pin to taskbar option.
This will add the Lock Screen Shortcut to the taskbar, making it easy to Lock Screen on your computer at any time by double-clicking on the Shortcut.
5. Automatically Lock Screen Using Screen Saver
Using Screen Saver Settings, you can make your computer to automatically Lock Screen as soon as the screen saver pops up.
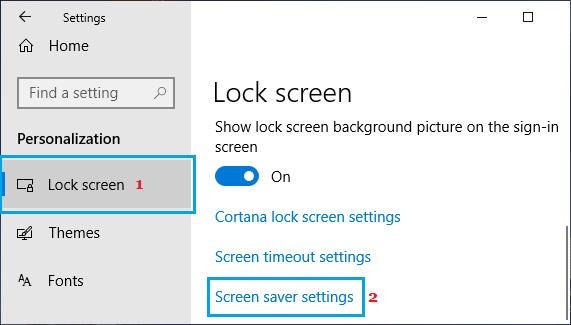
Go to Settings > Personalization > Lock Screen > scroll down in the right pane and click on Screen Saver Settings link.
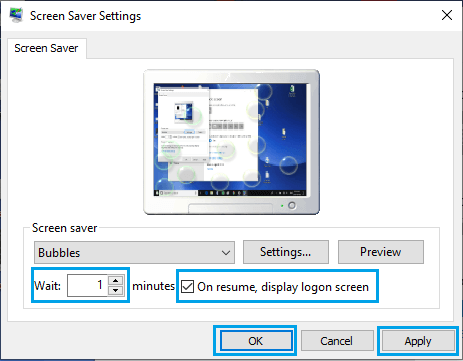
On the Screen Saver Settings screen, select On resume, display logon screen option.
Click on Apply and OK. As you can see in above image, the Wait option allows you to set the wait time, after which the screen Saver becomes active on your computer. After the Screen Saver gets triggered, you can exit the Screen Saver by tapping on the track pad (or pressing any key) and enter your Login Password to get your User Screen.
Fix: Change Screen Saver Option Grayed Out in Windows 10 How to Delete Desktop Background Images in Windows 10
