Camera Not Working on Mac
The built-in Camera on a MacBook is also known as FaceTime Camera and you can find it located in the center of the top edge of the screen. By default, the Camera on a MacBook is designed to open automatically when you use FaceTime, take Photos, record videos or make video calls using Skype, WhatsApp and other Apps. If the Camera is not working, you may see a pop-up message reading “There is no connected camera” or “Camera Disconnected” or “Camera Unavailable”. Such error messages can be generated both in case of a problem with the camera itself and also due to software issues which can be fixed.
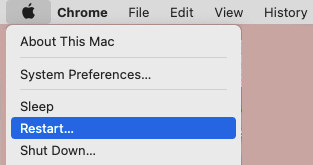
1. Restart MacBook
Sometimes, the problem is due to a stuck program, process or software glitch interfering with proper functioning of the Camera App or Apps trying to access the Camera on your Mac. Click on Apple Logo in top-menu bar and select Restart option in the drop-down menu.
After Mac restarts, check to see if the Photo Stream Album is now showing on your device and it is showing the latest uploaded Photos.
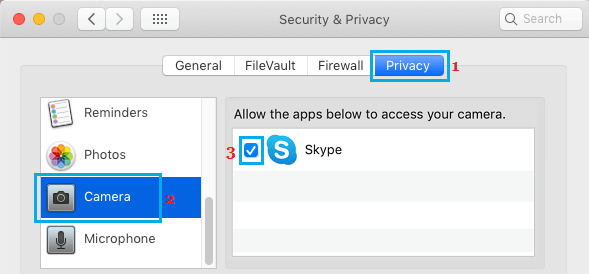
2. Allow Apps to Access Camera
If the MacBook Camera is not working while using third-party Apps (Skype, Microsoft Teams or Zoom), the problem is usually due to the App not being allowed to access the Camera on your computer. Go to System Preferences > Security & Privacy > switch to Privacy tab and select Camera in the left-pane. In the right-pane, make sure that the Third-Party App is Allowed to access Microphone.
After this, you should be able to use the Camera on your Mac.
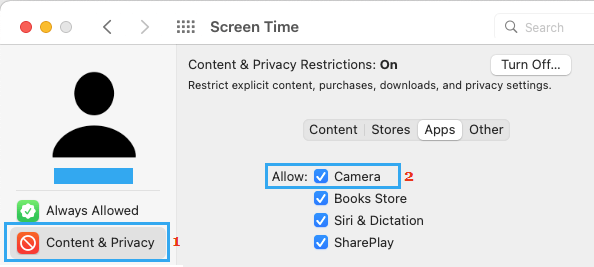
3. Check Screen Time Settings
Click on Apple Logo > System Preferences > Screen Time > select Content & Privacy in the left-pane. In the right-pane, switch to Apps tab and make sure that Camera is allowed.
4. Install Updates
Click on Apple Logo in top-menu bar and select About This Mac option.
On the next screen, click on Software Update and follow the instructions to install the Updates (if available).
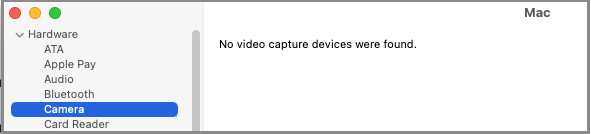
5. Check System Report
Click on Apple Logo in top-menu bar > About This Mac > System Report > Select Camera in the left-pane. In the right-pane, you should be able to see the Camera Details.
If you do not see any information about the Camera or see an error, it means that the Camera is disconnected or broken.
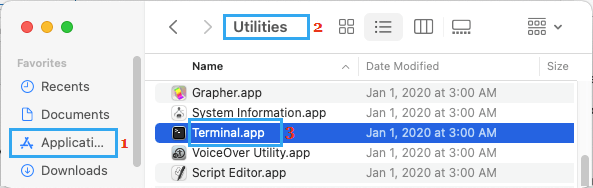
6. End Stuck Camera Processes Using Terminal
Sometimes, the problem is due to the camera still being occupied by a previously used App that did not quit properly. Click on Finder Icon > Applications > Utilities > Terminal.
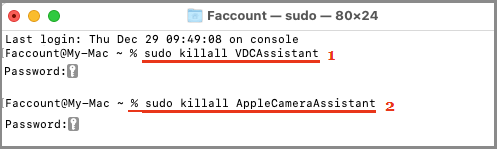
On the Terminal screen, type sudo killall VDCAssistant and press the Enter key. Next, type sudo killall AppleCameraAssistant and press the Enter key.
This will release the Camera from the stuck App and make it available for other Apps.
7. Reset PRAM
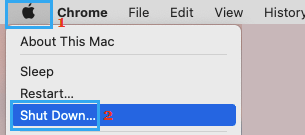
Disconnect all external devices from your Mac and follow the steps below to Reset PRAM. Click on Apple Icon in top-menu bar and select Shut Down option in the drop-down menu. Wait for the computer to completely shut down.
Press the power button to start your Mac and immediately Press & Hold Command + Option + P + R keys at the same time for about 20 seconds. Keep holding down the 4 Keys as you hear the first start-up sound and Release All the Keys at once, once you hear the second start-up sound on your Mac. This will Reset NVRAM or PRAM on your Mac and this should hopefully fix the problems on your Mac.
8. Reset SMC
MacBook’s SMC can sometimes become confused or corrupted, leading to various problems, including the issue of Trackpad not working properly. The steps to Reset SMC on a MacBook vary, depending the model of your computer. Hence, it is recommended that you refer to this guide: How to Reset SMC MacBook.
9. Reset NVRAM
NVRAM (Non-Volatile Random-Access Memory) stores settings of most hardware components installed on a MacBook. It is quite possible that the reason for Trackpad not working on MacBook is due to corrupted NVRAM. You can Reset NVRAM on your MacBook by using steps as provided in this guide: How to Reset NVRAM or PRAM on Mac
10. Run Apple Diagnostics
You can try the built-in Apple Diagnostics tool on your MacBook to find and fix the problem with the Camera on your MacBook. The steps to Run Apple Diagnostics depend on the type of process (Intel or Apple Silicon) installed on your computer. Shut down the MacBook and remove all External devices connected to your device (except the Mouse/Keyboard) and follow the steps as mentioned on Apple’s Support Page. If you see NDC001, NDC003, NDC004, NDC005 or NDC006 codes, it indicates a problem with the built-in Camera on your Mac.
11. If Camera is Not Working in Skype
If the Camera on your MacBook is not working while using Skype, the problem might be due to Skype App not being updated or being corrupted or damaged. Hence, make sure that the latest version of Skype is installed on your Mac. If the problem still persists, remove and reinstall the Skype App on your MacBook.
12. Contact Apple
If you are still having problems with the Camera on your MacBook, the problem is most likely hardware related and you need to contact Apple Support.
How to Backup Mac to External Hard Drive Using Time Machine Tips to Speed Up Slow MacBook, Mac Mini and iMac