Self-Assigned IP Address on Mac
In a typical case of this nature, the MacBook appears to be connected to the Network (WiFi or Ethernet), but it fails to load webpages and comes up with “Self-Assigned IP” error. As indicated by the wordings (Self-Assigned IP Address), the reason for this problem is due to your Mac Assigning itself an IP Address that is not valid or not recognized on the network. Luckily, in most cases the problem of No Internet connectivity due to “Self-Assigned IP Address” can be fixed by rebooting the modem.
1. Power Cycle Modem/Router
Before going ahead with other methods, simply disconnect the Modem/Router from its power supply source > wait for 60 seconds and reconnect the Modem/Router back to its power supply. After this, you should find internet working properly on your Mac, as it starts using a valid IP Address on both WiFi and Ethernet to connect to the network.
2. Renew DHCP Lease
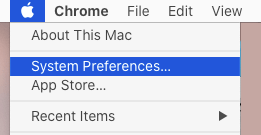
Click on Apple Logo in the top menu-bar and select System Preferences… in the drop-down menu.
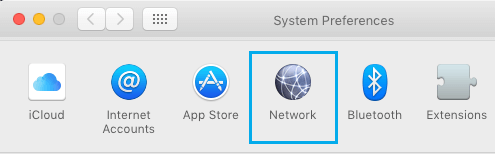
On System Preferences screen, click on the Network Icon.
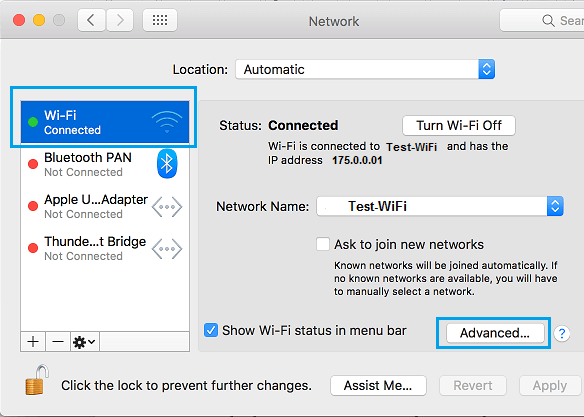
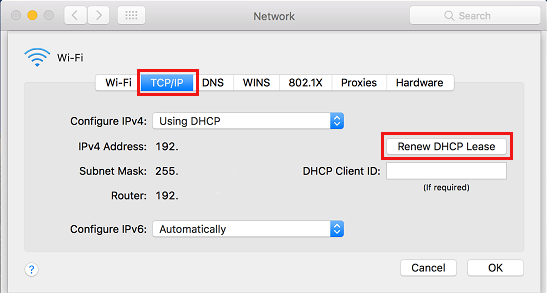
On Network screen, select your Network (Ethernet or WiFi) in the side-menu and click on Advanced.
On the next screen, switch to TCP/IP tab and click on Renew DHCP Lease button.
Click on OK to save the revised settings. After the DHCP lease is renewed, you should be able to connect to internet
3. Delete PLIST Files
The problem of No Internet on Mac due to Self-assigned IP Address can be fixed by removing certain files related to network connectivity on your computer.
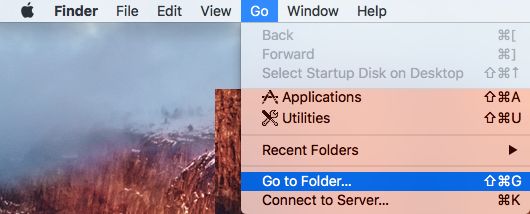
Click on the Finder Icon in taskbar > click on the Go tab in top-menu bar and select Go to Folder option in the drop-down menu.
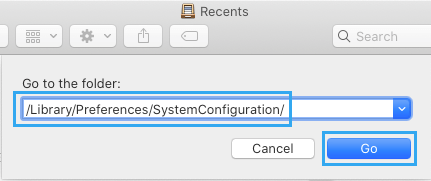
In Go-to window, Type /Library/Preferences/SystemConfiguration/ and click on the Go button.
In System Configuration folder, delete the following folders (right-click on the Folders and move them to trash).
com.apple.airport.preferences.plist com.apple.network.identification.plist NetworkInterfaces.plist Preferences.plist
Note: Your Mac will automatically recreate above Folders when it restarts. 5. Shutdown the MacBook > Wait for 30 seconds and Restart the Mac again and see if you can now connect to the internet.
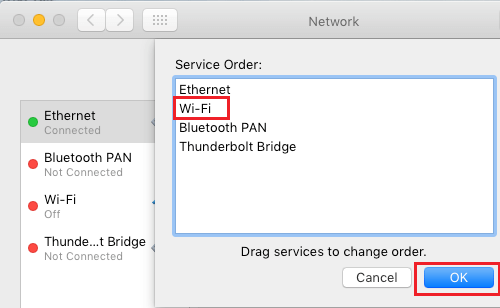
4. Set Service Order
Make sure that your MacBook is always connecting to your preferred network type (WiFi or Ethernet).
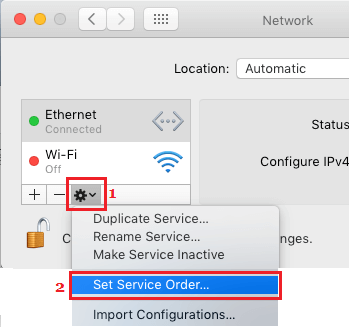
Click on Apple Logo > System Preferences > Network > On the Network screen, click on the Gear icon and select Set Service Order option in the drop-down menu.
On Service Order window, drag your preferred Network (WiFi or Ethermet) to the top position.
Once you are done, click on OK to save the changes.
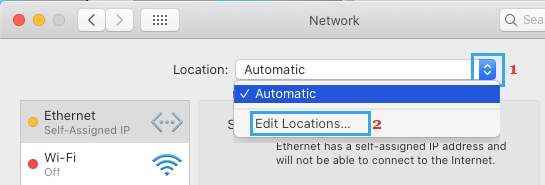
5. Create New Network Location
If you are still unable to connect to Internet, create a New Network Location on your Mac and renew its DCHP lease.
Click on Apple Logo > System Preferences > Network > On the Network screen, open the Location menu and select Edit Locations option.
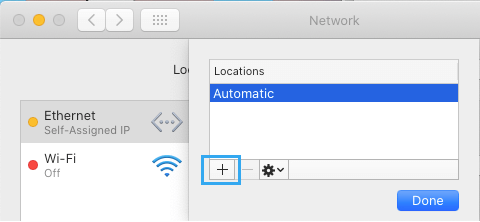
On the next screen, click on the Plus icon to Add New Location.
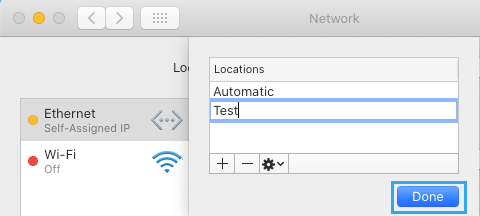
On the next screen, type a Name for the New Network Location and click on Done.
After creating new location, select either WiFi or Ethernet in the side menu and click on Advanced.
On the next screen, switch to TCP/IP tab and click on Renew DHCP Lease.
Click on OK to save the new settings. This should certainly fix “Self-Assigned IP Address problem and restore network connectivity on your Mac.
6. Switch to Google DNS
If your Mac is frequently struggling from Network connectivity issues, the problem might be due to the DNS Servers of your Internet Service provider being busy and clogged up. To fix this issue, you can consider switching the DNS servers on your Mac to Google DNS or Open DNS.
Tips to Speed Up Slow MacBook, Mac Mini and iMac How to Speed Up Slow Safari Browser on Mac