What to Do If iPhone is Not Charging
If an old iPhone or iPad is not working, the attention immediately goes to battery and most users start wondering if the battery is dead or has started malfunctioning. However, the act of charging an iPhone involves the Wall Adapter, Charging Cable, Charging Port and the Software installed on your device. Hence, it makes sense to make sure that the Wall Adapter, Charging Cable and the Charging Port on your iPhone are working properly, before thinking about changing iPhone battery.
1. Confirm iPhone is Not Charging
The first step is to make sure that your iPhone or iPad is indeed not charging. To confirm, plug your device for charging and take a look at the status bar next to the Battery icon.
Your device is charging, if you can see a Lightning bolt next to the battery icon. If you cannot see the lightning bolt, your iPhone is not charging. If you cannot see anything on the screen and the device is stuck on a black screen, the problem is software related and you should be able to fix this issue by Force Restarting iPhone.
2. Turn OFF iPhone and Charge
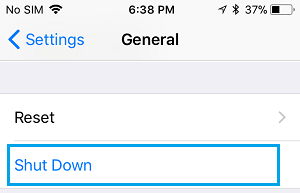
If iPhone is not charging, turn OFF your device completely and then try to charge by connecting your device to a Power Source. It is not exactly clear as to how this works, but it is likely that the act of Turning OFF iPhone helps in clearing stuck processes, which were interfering with the charging process. Go to Settings > General > scroll down and tap on Shut Down.
You will see Slide to Power OFF screen, use the Slider to Power OFF iPhone. Allow iPhone to completely Power OFF > Wait for 30 seconds and see if you can now charge your device.
3. Switch to Another Wall Outlet
It is possible that the Wall outlet to which your iPhone is plugged-in for charging is not working or has no power supply. This can happen if there is new construction or repairs being carried out in your area. To rule out this possibility, plug some other device to the same wall outlet (hair dryer or fan) and see if the outlet is able to supply power. If this particular outlet is not working, connect iPhone to another working Wall Outlet and see if it is charging now.
4. Switch to Another USB Port
If you are trying to charge iPhone using the USB Port on your computer, it possible that the USB port is not working. To confirm, plug iPhone to another USB port on your computer and see if it is charging.
5. Inspect Charging Cable for Damage
The problem could be due to the Charging Cable becoming damaged or faulty. This is more likely, if you are using an alternate low quality Charging Cable that is not certified by Apple. If the USB Cable looks old and has cracks, try charging iPhone using another Charging Cable. If you are buying a new USB to Lightning Cable, make sure it is Apple Certified.
6. Change USB Adapter
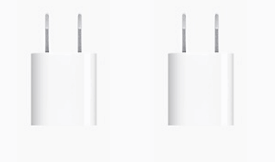
It is quite common for USB Wall Adapters to get damaged and start malfunctioning, especially if they are of low quality.
To confirm, switch to a new USB Adapter or try charging another device using the same USB Wall Adapter.
7. Inspect Charging Port
Over a period of time it is possible for dust, debris, pocket lint and other stuff to form a buildup in the charging port and interfere with charging. Hence, take a good look at the Charging Port on your iPhone and see if it is clogged or obstructed in any way.
If you see an obstruction, use a toothpick to remove the obstruction. Make sure that you take care not to damage the charging port or push the obstruction further down into the port. Once the charging port is cleared out, try charging your iPhone and see if it is now charging.
8. Force Restart iPhone
The act of Force Restarting iPhone has the potential to clear and fix glitches which might be contributing to charging and other iPhone problems. Depending on the Model of your iPhone, follow the steps below to Force Restart your device. iPhone 8 and above: Press and release Volume Up > Volume Down > and then press and hold the Side button (ON/OFF), until Apple logo appears. iPhone 7/7 Plus: Press and hold Volume Down + Power (ON/OFF) buttons, until you see Apple logo. iPhone 6 and below: Press and hold Home + Power (ON/OFF) buttons, until you see your device starting with Apple logo. After iPhone restarts, you should be able to charge your device.
9. Inspect iPhone for Water Damage
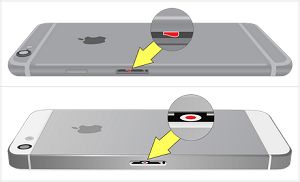
Water or Liquid Damage can prevent iPhone from charging. Hence, you need to rule out this cause, especially if you have any reason to suspect that your device may have come in contact with water or any other liquid. Take a close look inside the SIM Tray opening and see if you can see a white circular sticker. If the sticker is all white or silver, your iPhone is free from Liquid or Water damage.
If you see a Red dot in the middle of the sticker, it confirms that your device has indeed come into contact with Water. The white Sticker, known as Liquid Contact Indicator (LCI) is designed to activate whenever iPhone comes in contact with water or any liquid containing water. Although, we haven’t tried this ourselves, one of the suggested methods to dry out water from iPhone is to place it in a sealed plastic bag along with some Silica Gel packets. The general advice in this regard is not to charge an iPhone that has suffered Water Damage. It can take up to 48 hours or more for water to dry out from iPhone.
10. Contact Apple Support
If your iPhone is covered by Apple Care, the best option is to get your device checked by an Apple Care Technician. If your device is not covered by AppleCare or SquareTrade Warranty, try to get an estimate for the cost of repairs. You can go ahead with repairs, if the cost of repair is significantly lower than the cost of replacing your iPhone with a new or another used iPhone.
How to Improve iPhone Battery Life How to Speed Up Slow iPhone

![]()


